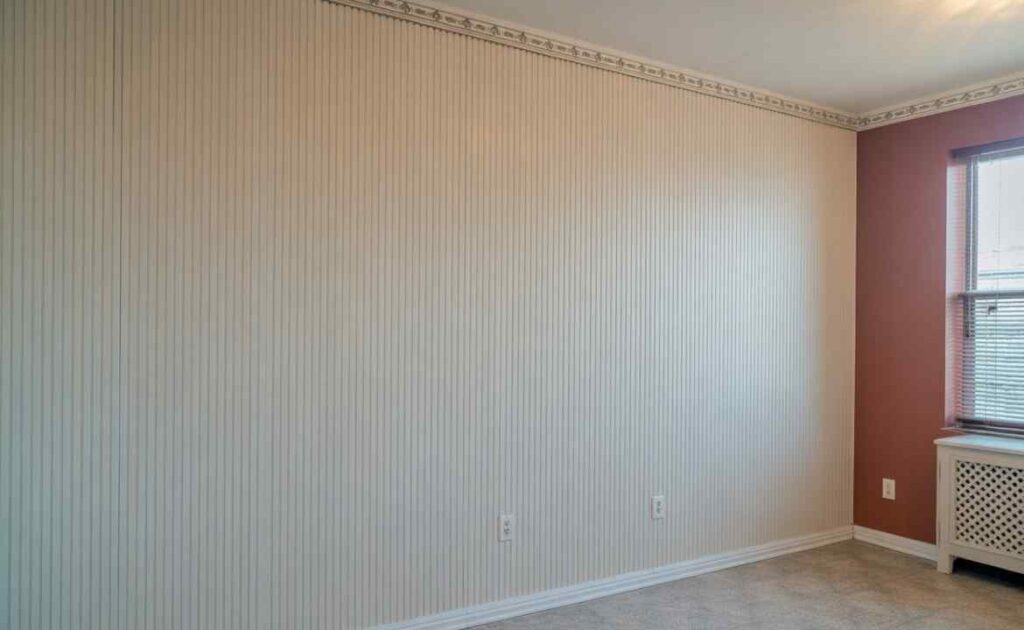
Installing a melamine board can transform a plain rental wall into a clean, stylish surface without causing damage. This guide shows you how to install a melamine board vertically on the wall safely. You will learn simple methods that work well in rental homes, even when you want to avoid holes or heavy tools. You also discover how vertical melamine panel installation adds height to small rooms, adds texture, and makes the wall look modern without expensive work. Many renters look for home renovation ideas that stay budget-friendly, and this project delivers strong results with little effort.
You get clear steps, tool tips, USA-approved wall anchors, and safe adhesives so you can follow the whole process easily. You also learn about wood studs, removable adhesives, and simple levelling tricks to achieve smooth vertical alignment without damage. When you finish, your melamine wall will look neat, tight, and professionally installed, and you can reverse the project when you move out.
What Is Melamin Board and Why Use It in Rental Home Renovation?
Melamine board is a pressed board with a strong plastic coating, and many USA renters choose it because it stays smooth, durable, and simple to clean. When you learn how to install melamine board vertically on the wall, you discover that melamine gives a modern look without special carpentry skills. It is also useful for interior wall upgrades in rentals, where you want beauty without damaging drywall. The surface stays flat, so it is excellent for small homes that need extra visual height.
Many renters also prefer melamine because it works for melamine sheet installation in home projects where you need panels that are strong but still light. The glossy or matte coating keeps moisture out and creates a sleek look. If you like decorative wallboard installation ideas, melamine offers many choices in colour, texture, and finish.
Tools and Materials You Need Before Installing Melamine Board
When you prepare for DIY wall panel installation, it helps to gather all tools early so the job runs smoothly. The tools are safe for apartments, and you can choose options that suit your comfort level. You should keep a stud finder handy, as you often need to check for wood studs when planning how to mount boards safely on the wall. A soft pencil, level, tape measure, removable adhesive strips, and lightweight brackets can help a beginner feel confident.
You also want cutting tools for the board. When you think about the melamine board cutting technique, remember that melamine chips easily, so a fine-tooth blade works best. For renters who fear holes, you can pick adhesive for melamine board instead of screws. For people who want more substantial support, a cordless drill helps drill into walls safely without causing damage.

Preparing the Wall Surface for Vertical Installation
Wall preparation helps the board stay tight and straight, so these wall preparation steps matter even in rentals. Start by wiping the wall gently, as dust and oils can weaken removable adhesives. A clean wall also helps the board sit flat and stay aligned. Many people skip this step, but it keeps the surface from peeling later.
If the wall has bumps or loose paint, fix them lightly without oversanding. Simple patches help the board sit better during vertical wall mounting and reduce its movement. If your rental wall has texture, you can still attach melamine, as vertical installation reduces pressure and covers flaws.
Measuring the Wall for Vertical Mounting
Accurate measurement shapes the whole project, and this part helps you get perfect melamine board measurements before you start. Use a long tape measure and mark the height at both ends of the wall. Because homes settle, one side can be slightly higher. Measuring both sides gives you a more reliable result. After that, use a level along the wall to keep the board straight during the vertical panel wall design steps.
When you finish measuring, mark light guide lines so you can place the board exactly where you want it. These lines help you achieve smooth vertical alignment even when working alone. The lines act as a roadmap for the entire installation.
Finding Wall Studs and Deciding the Support Type
Studs give strong support, and they make your board installation safer. Use a stud finder to locate them, as wall studs for mounting boards provide better holding power. If you install melamine board on studs, your wall will feel stable and tight. This helps in homes where you want to avoid shifting or dropping boards.
If you cannot reach a stud, you can still install your board. Many renters choose melamine board support options like removable anchors, command strips, or small brackets that pop off cleanly later. This helps people who want a secure panel but still need a non-damage wall installation that they can undo fast when moving.
Cutting and Pre-Drilling the Melamin Board (If Required)
Melamine cuts differently from standard wood, so cut it carefully to avoid rough edges. A slow, fine cut helps the board stay sharp and clean. Many renters test a small scrap first to understand blade speed and pressure. It makes DIY vertical panel projects in any home easier and safer.
Pre-drilling sometimes helps if you plan to use screws, but you must drill gently because melamine chips easily. Many people drill through tape to keep the edges smooth. If you avoid screws, this step becomes optional, since installing panels without damaging walls usually means using adhesives or brackets rather than holes.
Step-by-Step Process: How to Install Melamine Board Vertically on the Wall
This section shows the complete method for installing melamine board vertically on the wall in a clean, simple way. Start by placing the board near the wall and lining it up with your pencil marks. If you work with removable adhesive, apply the strips or pads evenly to the back of the board so it stays flat. If you use brackets, screw the brackets into the top and bottom edges and tighten them gently. These steps help you create a rental-friendly installation that feels sturdy without making big marks.
Now press the board onto the wall, recheck the level, and adjust as needed. A slow push helps the adhesive bond strongly. If you use screws, tighten them carefully so the board stays firm. This also allows your home improvement guide to look professional and clean. When you finish this step, check the board from every angle to see if the alignment seems balanced.
Securing the Board Safely Without Damaging Rental Property Walls
Renters often worry about damage, so this section explains how to secure the board safely. Many USA renters use removable adhesives because they avoid holes and help with temporary wall panel fixing skills. They also work with smooth-wall apartments, which are commonly found in rental communities. If your melamine feels heavy, you can add small brackets, as melamine board brackets provide extra strength without damaging the drywall much.
Some people ask whether screws can damage a wall. Light screws cause tiny holes that patch easily with simple filler. This still counts as non-damage wall installation for most landlords because the wall looks new after repairs. Cleaning edges and tightening corners also helps keep the board stable.
Finishing Touches to Make the Installation Look Professional
After mounting your board, clean the edges and add finishing details so the wall looks like a finished project rather than a quick fix. Some renters add slim trim strips around the panel to make the board feel more built-in. When you pick trim, match the thickness so the surface stays even. This creates a decorative wall board installation that blends with your rental style.
If your melamine board has exposed screw heads, cover them with fastener caps that match your board colour. This makes the panel look like a real melamine wall panelling project instead of a temporary setup. You can also wipe the board clean, as some melamine finishes hold dust easily.
Maintenance Tips and How to Remove the Board When You Move Out
Melamine is easy to clean. Use a soft cloth and a mild cleaner to wipe dust, fingerprints, or cooking film from apartments with open kitchens. This keeps your vertical melamin wall looking bright and helps your vertical wall mounting stay stable. With good care, melamine stays new for years. You can also check if adhesive pads feel loose and replace them as needed.
When moving out, lift the panel gently and slowly pull the removable adhesive. This step helps you remove the melamine board safely without ripping the drywall. If you used screws, fill the holes with spackle and wipe them flat with a damp cloth. Walls look new again in minutes, and landlords usually appreciate careful handling.
Common Mistakes to Avoid When Learning How to Install Melamine Board Vertically on the Wall
Many renters rush through the measuring steps, which leads to tilted panels. Slow work helps you avoid crooked lines when mounting boards on wall plans. Others skip checking the wall texture and end up with weak adhesion. This creates shifting panels that fall easily. Working gently and measuring twice makes the project safer from the start.
Another mistake is choosing the wrong adhesives or screws. Incorrect fasteners can crack the melanin or harm the wall. People who skip support also ignore the screw vs adhesive for melamine board differences and end up with weak boards. Pick the method that matches your wall type to keep your melamine firm.
Comparison Table: Installation Options for Rental Homes
| Method | Best For | Damage Level | Notes |
| Removable Adhesive | Light melamine boards | Very Low | Best for renters who avoid holes |
| Light Screws | Heavier boards | Low | Holes patch fast with filler |
| Brackets | Medium to heavy boards | Low | Adds stronger support |
| Combination | All walls | Medium | Adds balance and a tight fit |
15 comments
Ремонт бытовой техники является важнейшим процессом, который позволяет продлить срок службы приборов . Это связано с тем, что приборы, требующие регулярного ремонта, могут преждевременно потерять свою функциональность. Кроме того, ремонт позволяет выявить и устранить потенциальные проблемы до того, как они станут серьезными .
Ремонт бытовой техники имеет приоритетное значение для людей, которые хотят максимально продлить срок службы своих вещей. регулярный уход за бытовой техникой может существенно экономить средства семьи . ремонт можно осуществлять как самостоятельно, так и с привлечением квалифицированных специалистов .
Типы ремонта бытовой техники
Типы ремонта бытовой техники могут различаться в зависимости от характера неисправности . Например, ремонт электрических схем может быть необходим для устранения неисправностей в плите или холодильнике . Кроме того, ремонт может быть выполнен в сервисном центре или на дому, в зависимости от желания клиента .
Степень сложности ремонта бытовой техники может быть разной, в зависимости от типа неисправности . ремонт незначительных неисправностей, таких как неисправность термостата или неисправность реле, может быть осуществлен с помощью простых инструментов. Кроме того, ремонт бытовой техники может быть осуществлен с использованием как оригинальных запчастей, так и их аналогов, в зависимости от предпочтений клиента .
Инструменты и материалы для ремонта
Для выполнения ремонта бытовой техники требуются определенные инструменты и материалы . для ремонта электрических элементов необходимы инструменты, такие как тестер и провод . ремонт можно осуществлять с использованием специальных материалов, таких как клей и краска.
Тип инструментов и материалов, необходимых для ремонта бытовой техники, может быть различным, в зависимости от типа ремонта. для ремонта простых неисправностей могут быть необходимы только элементарные инструменты, такие как ключ и напильник . ремонт можно осуществлять как с использованием ручных инструментов, так и с использованием электроинструментов, в зависимости от сложности ремонта.
Профессиональный ремонт и его преимущества
Профессиональный ремонт бытовой техники имеет ряд преимуществ, включая гарантию качества и безопасность . профессиональные ремонтники используют только качественные запчасти и современные инструменты. профессиональный ремонт может быть выполнен оперативно и с минимальными затратами .
Профессиональный ремонт бытовой техники предполагает не только ремонт, но и диагностику и профилактику . профессиональные ремонтники могут выявить потенциальные неисправности и устранить их до того, как они причинят значительный ущерб . профессиональный ремонт может быть выполнен с учетом конкретных потребностей и требований клиента .
сервисный ремонт бытовой техники [url=https://www.remont-bytovoj-tehniki-ekaterinburg.ru]https://remont-bytovoj-tehniki-ekaterinburg.ru/[/url]
ремонт бытовой техники рядом https://remont-tehniki-na-domu-ekaterinburg.ru/
открыть магазин с фиксированной ценой [url=https://oneprice.shop/]открыть магазин с фиксированной ценой[/url].
http://www.google.us/url?q=https://oneprice.shop
Купить пластиковые окна на заказ в Москве — это отличный способ улучшить энергоэффективность вашего дома и повысить его комфорт.
Основное преимущество пластиковых окон заключается в их долговечности.
Купить пластиковые окна на заказ в Москве — это отличный способ улучшить энергоэффективность вашего дома и повысить его комфорт.
Пластиковые окна легко чистятся и не требуют регулярной покраски.
Если собираетесь отпуск в Италию, советую вам посмотреть на агротуризм в Тоскане – это отличный способ ощутить ландшафтами и тосканской кухней. Крайне интересен агротуризм Италия Тоскана, где получится оказаться на фермах, отведать вино и посетить термы Тоскана. Для фанатов активного туризма подойдет маршрут по Доломитовым Альпам на машине или trip по амальфитанскому побережью на машине, а если хочется культурной программы, не обойдите вниманием маршрут по Венеции за 1 день с развернутой картой на сайте венеция маршдоломитовые альпы маршрут на машине .
Помимо этого, для любителей шопинга Флоренция открывает прекрасные аутлеты во Флоренции, включая The Mall – о них обычно отличные отзывы. Если желаете посетить Венецию, важно знать размер оплаты гондолы в Венеции и как прибыть до туристических мест, в частности, таких как Святой лестницы или античных императорских форумов в Риме. А если путешествуете с детьми, есть огромное число вариантов, которые отлично подходят для семейного отдыха, как например, экскурсии из Неаполя в Помпеи или поездка на паром из Неаполя на Капри.
При планировании путь из Неаполя в Сорренто, полезно знать длину пути и способы транспорта, с учетом паром из Неаполя на Капри. Для интересующихся истории рекомендуется посетить Палатин в Риме и Национальный Римский музей — данные места дают отличное представление о римской культуре.
Для тех, кто желает провести день в Венеции, идеально подойдет маршрут для ходьбы с визитом к главных локаций, таких как Площадь Венеции и Площадь Капитолия, а также следует не забыть про тур на гондоле — стоимость вполне разумна. Если интересует подробная информация по локациям и маршрутам, заходите сюда паром из неаполя на капри .
Если вы собираетесь на поездку в Потсдам и задаётесь вопросом, что посмотреть за один день, то стоит непременно посетить Сан-Суси, Голландский квартал Потсдам и дворец Глиникке. Для энтузиастов природы и отдыха в тишине отлично станет идеальным японский сад в Дюссельдорфе или экскурсия по паркам Германии, таким как лихтенхайнский водопад и крепость Кёнигштайн.
К тому же рекомендую заехать на барахолку в Дюссельдорфе — блошиный рынок с интересными находками по адресу штольценфельс . А если отправляетесь в путь с детьми, то фантазия ленд представит весёлые аттракционы, стоимость на билеты и подробности можно узнать на их официальном сайте. Не обращая внимания на интересов, Германия изобилует на достопримечательности, от замков Берлина до зелёных маршрутов немецкой дороги сказок.
Если планируете отдых на озере Шира, стоит заранее ознакомиться с вариантами размещения на Шира. Крайне популярны базы отдыха Шира Жемчужный и База отдыха Три Звезды Шира, где легко снять комфортные домики по умеренной цене и насладиться уютом, например, базой отдыха Шира с бассейном. Для почитателей природы настоятельно советую посетить Сад камней Шира — это великолепное место для прогулок и медленного отдыха у воды.
На портале база отдыха шира с бассейном вы получите обширную информацию о жилье на Шира, вместе с базы отдыха на Шира и озеро Шира базы отдыха с всевозможным уровнем комфорта. Кроме того рекомендую взглянуть на варианты домиков Жемчужный Шира и базы отдыха с бассейном, которые отлично подойдут для семейно-го отдыха. Не забудьте про особую атмосферу и развлечения, вроде катекс Шира или «Бегущая по волнам» — это обеспечивает отдых на Шира значительно более запоминающимся.
Здравствуйте всем! Замышляю поездку в Таиланд и хочу определиться, сколько стоит путёвка в Таиланд и какой финансы брать на 10 дней — любопытно узнать, сколько средств брать в Таиланд на кафе, экскурсии и отдых, главным образом на Пхукете и Самуи. Дополнительно хочу понять, когда удачнее ехать в Тайланд (Пхукет), беря в расчет сезон фруктов, погоду и экскурсии, а то впечатления и советы существуют разные. Так, полезно знать, как передвигаться в аэропорту Пхукета и сколько обойдется трансфер между Пхукетом и Самуи, включая паром и такси, все это влияет на общий план поездки.
Те кто недавно был на Патонге, поделитесь, стоит ли осмотреть рынок Патонг и торговые центры, а также где предпочтительнее менять деньги — слышал, что есть самый прибыльный обменник на Пхукете. Насколько спокойно брать в аренду байк без прав и какие массажи на Пхукете на самом деле качественные? Также ищу советы по путешествиям и интересным местам например Райли Бич и пятиминутка по самым красивым островам Таиланда. Для тех, кто ищет подробностями — нужная информация здесь: [url=https://bangkokescape.ru]сколько стоит путёвка в тайланд[/url] .
Коли планируете поездку в Таиланд, стоит заблаговременно до поездки ознакомиться с главными островами, такими как Пхукет и Самуи. Пляжи Самуи на карте удачны для выбора безупречного места отдыха, а для переезда между островами пхукет самуи как добраться — важный вопрос. Кстати, стоит помнить о разницу во времени с Таиландом и правила въезда в Таиланд 2025, чтобы поездка случилась максимально комфортно.
Для тех, кто беспокоится о ценами, целесообразно знать, сколько денег брать в Таиланд на 10 дней и расценки аренды байка на Пхукете. Также предлагаю почитать отзывы об андаманда Пхукет и узнать подробности с океанариум Пхукет, это превосходный способ разнообразить отдых. Детальнее по планированию путешествия и обмен валюты Пхукет можно отыскать здесь тайланд .
Если вы ищете прямые воздушные рейсы из Еревана в Европу или альтернативные направления, стоит обратить внимание на аэропорты черногория, литва, Польши и Болгарии — оттуда периодически летают привлекательные lowcost рейсы. Чрезвычайно выгодно искать бюджетные авиабилеты из Москвы за границу, с учетом горящие предложения и экономичные варианты, например, в Чехию, Новую Зеландию или Доминикану. Для разработки поездки рекомендуется проверить варианты по направлениям и аэропортам на аэропорты в греции , где легко смотреть сразу и прямые рейсы, и самые дешевые билеты.
Также, если вам нужны бюджетные авиабилеты из Ташкента, Анталии или Берлина, не упускайте из виду про часто используемые аэропорты Израиля, ОАЭ и Англии. Эти направления нередко предоставляют очень привлекательные тарифы и low cost решения. А если важно знать, куда недорого слетать из Москвы или куда есть прямые рейсы из Тель-Авива, стоит изучить аэропорты Норвегии и Португалии — там можно выбрать действительно выгодные варианты для отдыха и вояжей.
Коли вы планируете туры и вы ищете прямыми рейсами из всевозможных городов, нужно обратить внимание на программы по аэропортам Филиппин, Зимбабве, Дании и Венесуэлы. Так, доступны прямые рейсы из Стамбула в Европу и Анталию, а также рейсы из Еревана в точки Европы города, что может существенно облегчить путешествия. Для поиска самых дешевых авиабилетов из Москвы, Лондона, Стамбула или Минска, а также из этих городов, как Екатеринбург и Вроцлав, можно использовать ресурс аэропорты в оаэ , где содержится информация о выгодных вариантах и последних билетах.
Более того, стоит знать, что аэропорты США, Польши, Албании и ОАЭ гарантируют богатый выбор направлений, включая популярные точки в Таиланде, Доминикане и Нидерландах. Любопытно, что в отдельных странах, как на Мальте или в Англии, количество аэропортов помогает легко отбирать оптимальные маршруты. Если вы хотите найти куда дешево улететь из Москвы, Дубая или Стамбула, нужно изучить варианты по лоукостам и прямым рейсам, чтобы максимально сэкономить на перелетах.
In case you’re trying to work out “what season am I” in terms of seasonal color analysis, initiating with your skin tone and undertone is crucial. For example, a deep summer color palette works great for those with an olive skin tone or yellow undertone skin, merging cool and muted shades that match colors like deep blues and soft roses. Aids like the colour analysis app or an online quiz can simplify this process, providing insights into skin tone charts and vein test undertones to help determine your best colors, whether it’s the soft summer color palette, deep winter color palette, or light spring color palette. For a practical guide, check out skin tone chart to investigate palettes and analysis tips suited for various skin tones such as amber skin tone, pale skin, or warm beige skin tone.
It’s also useful to consider advanced options like color analysis pro for a more in-depth breakdown; though some users examine how to cancel subscription plans if they want to test the service before committing. Whether you’re eager about the best colors for pale skin or want to pinpoint the right clothing colors for yellow skin tone females, recognizing your seasonal color palette can really upgrade your wardrobe choices. Cost-free color analysis tools, apps, and quizzes offer a great foundation to explore skin color types and determine flattering hues that harmonize with your natural coloring, from deep summer celebrities to those with reddish undertone skin.
Планируя отдых в Таиланде, особенно на Пхукете или Самуи, нужно понимать, сколько стоит поездка в Таиланд и сколько брать денег для комфортного отдыха на 10 дней. Например, цены на прокат байка на Пхукете без прав и тариф на экскурсий, в том числе поездку на пароме с Пхукета на Самуи, заметно варьируются. Рынок Патонг и шопинг-центры на Патонге заинтересуют разнообразием товаров и экзотических фруктов, а массажные студии предлагают услуги разных категорий, с учётом массаж с хэппи эндом. Чтобы не потеряться в транспорте и трансферах, стоит узнать, как маневрировать в аэропорту Пхукета и как добраться от Пхукета до Самуи без посредников, например, на такси или пароме. Подробнее нужную информацию можно найти тут паром пхукет самуи
Что касается времени поездки, оптимально ехать на Пхукет и в другие части Таиланда в сезон с ноября по апрель, когда условия наиболее отличная. Безопасность тоже принципиальна: стоит знать правила въезда в Таиланд для россиян в 2025 году, а также не забывать о возможных опасных животных и анализировать отзывы туристов об отдыхе в Андманде и других районах. Любителям природы и насыщенного отдыха стоит открывать пляжи Рейли Бич и заниматься снорклингом, чтобы увидеть живописных рыб Таиланда. Стоит также планировать бюджет, принимая во внимание цены на питание, массаж, экскурсии и размен валюты – самый прибыльный обменник на Пхукете поможет уберечься от лишних затрат.